Using GNOME Time Tracker
Working with GNOME Time Tracker
Notice: The current version of GTT has many, many new features which are not documented in this manual. A few of the features documented below might work slightly differently in this new version.
GNOME Time Tracker can be used to keep track of the amount of time you spend on different things you do. You do this by defining several projects and then, as you go through the day, telling GNOME Time Tracker which project you're working on. It will tell you how much time you spend on each project each day, the total time spent on each project, and the amount of time logged on all projects each day.
Unfortunately, GNOME Time Tracker isn't particularly smart: it won't turn the timer off for you if you take a break for a quick game of solitaire and it turns into several hours of distraction. The inactivity timer will notice that you are still using the keyboard and mouse; it does not know that its just solitaire. When you stop work on a project, be sure to turn off the timer by clicking the Timer button or using Stop from the Timer menu. As long as you remember to do this, your work will be recorded effectively. You can, however, alter the times from the Properties dialog if they are incorrect. See for more information.
GNOME Time Tracker can inform you about your project times in several ways. For each project, it maintains a timer for the amount of time you have spent on the project today, this week, this month, this year, and how much time you have spent on it total. In addition,GNOME Time Tracker counts how much time you have spent on all projects in the current day. This last figure is the one displayed in the lower left hand corner of the status bar.
When you first start GNOME Time Tracker, you see the Main window, as shown in .
The main window consists of four areas. There is a menu bar (see ) and a toolbar (see ) at the top of the window, a status bar (see ) at the bottom of the window, and between the toolbar and the status bar, a scrollable project list (see ). When you startGNOME Time Tracker for the first time, this area will show just one project, which is titled "empty".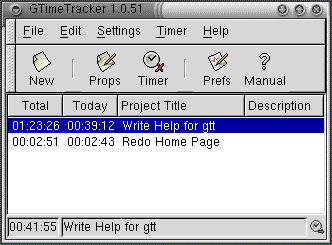

Menus
Nearly all menu items in GNOME Time Tracker have a shortcut or accelerator key. Shortcuts appear right after the name of the menu item on the menus.
The menu bar consists of four menus: File, Edit, Timer and Help.
- File
This menu contains the following commands:
— New Project ( Ctrl-N ) New Project brings up the New Project dialog so you can create a new project.
— Reload Configuration File ( Ctrl-L ) This loads the last saved version of the configuration file, $HOME/.gnome/gtt. This file is saved every time GNOME Time Tracker quits, and it holds information about your preferences and projects. If you choose this menu item, your projects will revert to their status at the time of the last configuration file save.
— Save Configuration File (Ctrl-S) This function saves information about your projects and preferences in the configuration file $HOME/.gnome/gtt. GNOME Time Tracker saves this information automatically every time you quit, and tries to do so even when it crashes. Still, it never hurts to save your project information from time to time.
— Quit (Ctrl-Q) Quits GNOME Time Tracker. Quitting automatically saves project data and updates the logfile.
- Edit
This menu contains the following commands: Cut (Ctrl-X) — Removes an item from the project list, saving it in memory if you want to paste it back in somewhere else.
Copy (Ctrl-C) — Duplicates a selected project, copying it to memory.
Paste (Ctrl-V) — Places the project in memory onto the task list. Projects are inserted before the selected item. If no item is selected, they will appear at the bottom of the list.
Clear Daily Counter — This function is a quick way to clear the daily counter for the currently selected project. You can use it if you want to time a process more than once. This is useful if you want to track how long a PPP connection to the internet lasts, or for timing compilation and other repeated tasks. This command does not affect the global timer.
Properties... — This selection opens the Properties dialog for the currently selected project. Here you can view and edit the name, description, and times for your project. Note that this is the same action as the Props button on the toolbar. See for more information.
- Settings
This menu contains only one command: Preferences, which launches the Preferences Dialog. See for more information.
- Timer
This menu contains the following commands: Start (Ctrl-A) — Starts the timer on the selected project.
Stop Timer (Ctrl-Z) — Stops the timer.
Toggle Timer (Ctrl-T) — This item toggles the timer on or off.
- Help
This menu contains the commands: Manual — Shows this manual.
Introduction — Displays the introduction to this manual and to GNOME Time Tracker generally.
Working with GTT — Displays the section of the manual about working with GNOME Time Tracker.
The Main Window — Help with the Main Window.
Dialogs — Displays information about the various dialog boxes that GNOME Time Tracker will display.
About — Displays copyright and author information for GNOME Time Tracker.
The Toolbar
The toolbar is another way to speed up your most frequently performed operations in GNOME Time Tracker. Each icon in it is a shortcut to one of the menu functions. By default, the buttons are:
New,which opens the New Projectdialog.
Props,which opens the Properties dialog.
Timer, which toggles the timer between on and off.
Prefs, which opens the Preference dialog.
Manual, which opens this manual.
Quit, which quits GNOME Time Tracker.
The Project List
The Project List contains a list of all your projects and indicates which project is active at any given time. It also shows the attributes of each project. You can alter those attributes from the Preferences dialog (see ).
What is a Project?
A project consists of the following:
A title, which is displayed in the project list.
A daily timer, which will be automatically reset each day, and which you can zero as you please.
A total time timer, which holds the total amount of time spent on the project.
A brief description of the project.
The State of a Project
A project has two states, selected and unselected. You can only select one project at a time.
If a project is not selected, nothing happens.
If a project is selected, but the timer is not running, the select-project shell command has been run and not terminated. No changes, however, are made to the log file.
If a project is selected and the timer is running, the shell command is executed and the log file is updated.
This might be confusing at first, but in combination with the shell commands (see ) you can use the variations in state to maintain more accurate and readable project logs.
Example 1. Using Project States
I have set the GNOME Time Tracker shell commands to update my .project file when I switch or deselect a project. I don't want to alter the file if I'm just taking a short break from a project. So, when I get up to get coffee, I stop the timer instead of deselecting the project. This leaves the .project file alone without counting the time I spend away from the project.
Working with the Project List
The project list is located in the central area of the main window. It shows the list of projects and which project is currently selected. Each line corresponds to one project, and displays the total and daily time logged for that project, as well as its title and description.
You can select a project by clicking on it with the left mouse button. Pressing the left mouse button again on a selected project deselects it. Note that you can only have one project selected at any given time.
To get a popup menu for a project, click the right mouse button on it. If the project wasn't selected, it will now receive the selection, and the Edit menu will be displayed.
The Status Bar
The first field of the status bar displays the sum of all projects' daily time. If you didn't zero a daily counter, it reflects the total time you have worked on your projects today.
The second field holds the title of the currently selected project. If no project is selected, the display reads: no project selected.
The far right corner of the status bar holds a small clock if the timer is running. If the timer is off, the space is blank.