Network Applets
The Mail Check Applet
The mailcheck applet is an applet which sits in your panel and tells you when you have new email. To add this applet to the panel, right-click on the panel and choose Add applet->Network->Mailcheck

Usage
You don't need to do anything in particular to run this applet. Providing it is looking in the right place for your email, it will run itself quite happily. The following options, however, are available:
Clicking mouse button 1 does nothing unless you have told it to start a program when you do this. You do this with the properties box described below.
Holding down mouse button 2 allows you to drag the applet around the panel (and between panels). option.
Clicking mouse button 3 brings up the typical applet menu which includes an About box and a properties
Preferences
The mailcheck properties dialogue box is divided into two sections, one for what the mail check applet does, and one for where it checks for email.
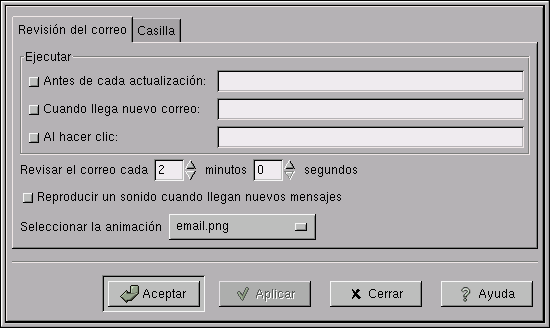
- Mail check options
The mail check options have six sections:
- Execute...before each update
Sometimes you may want to run something such as fetchmail before the applet checks for new mail. To do this, check the checkbox and fill in the program name in the space here.
- Execute...when new mail arrives
Sometimes you may want other programs to run when new mail arrives. It is common to tell the machine to play a noise at you, for example. Checking this checkbox and filling in the command (such as mpg123 sillynoise.mpg or esdplay sillynoise.wav) will let this happen.
- Execute...when clicked
By putting a program name (generally a mail-reader such as balsa or spruce here and clicking on the checkbox, you can set things up so that when you click button 1 on the applet, that program will be automatically run.
- Check for mail every...
You can adjust the range for checking whether mail has arrived between 1440 minutes (once a day) to never. Setting it to never is silly and will confuse it. The default value is every two minutes.
- Play a sound when new mail arrives
The sound played if you check this checkbox is an alarm bell. It is contained in $prefix/sound/events/mailcheck.soundlist; if you want to change it to a different sound, alter that and put the sound in $prefix/sounds/.
- Select animation
By clicking on the box with the animation name, you can get a list of different pictures which have different animations when new email arrives.
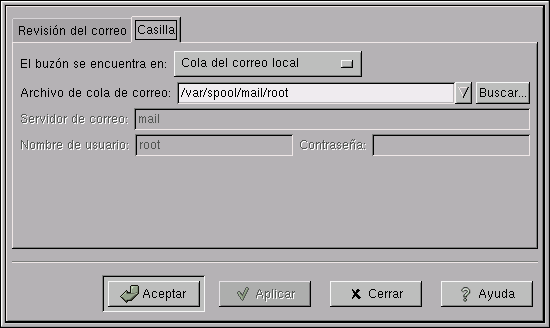
- Mailbox options
The mailbox options have four sections, some of which will be greyed-out.
By clicking on the box with the mailbox location, you can tell the mailcheck applet where to look for your incoming email.
When local mailspool or local maildir are selected as the location for the mailbox, then you can fill in the details on which file or directory the applet should check for new email. You can only put one filename here. The section about mail servers will be greyed out.
When remote POP3 or remote IMAP are selected as the location for the mailbox, then you can fill in the details on the mail server, username and password. If the you don't supply the password, the applet will ask for it when it first tries to check for mail. The section about local filenames will be greyed out.
Known bugs and limitations
Setting something to be executed before each update can hang the applet and the panel.
Sometimes the animation stops happening after prolonged use.
If you use a mail filter such as procmail, which sorts email into different folders, the applet won't check them all for new email. It will only look at one file.
Authors
Mail Check was written by Miguel de Icaza (<miguel@gnu.org>), Jacob Berkman (<jberkman@andrew.cmu.edu>), Jaka Mocnik (<jaka.mocnik@kiss.uni-lj.si>) and Lennart Poettering (<poettering@gmx.net>). Please send all comments, suggestions, and bug reports to the GNOME bug tracking database. (Instructions for submitting bug reports can be found on-line. If you are using GNOME 1.1 or later, you can also use Bug Report Tool (bug-buddy), available in the Utilities submenu of Main Menu, for submitting bug reports.
This manual was written by Telsa Gwynne (<telsa@linuxchix.org>) and Eric Baudais (<baudais@okstate.edu>). Please send all comments and suggestions regarding this manual to the GNOME Documentation Project by sending an email to <docs@gnome.org>. You can also submit comments online by using the GNOME Documentation Status Table.
Aplique del Monitor de Modem
El Aplique del Monitor de Modem, mostrado en Figura 51, monitoriza su modem mientras esté funcionando. Para ańadir este aplique al Panel, pulse el botón derecho del ratón sobre el panel y seleccione Panel->Ańadir al panel->Aplique->Red->Monitor de modem

Utilización
Este aplique se usa para ver si su modem está funcionando, y seguir su funcionamiento. También se puede configurar para que ejecute un "script" externo o programa para conectar y desconectar su modem cuando pulse en el boton con una sola bombilla verde.
Pulsando el botón derecho del ratón sobre el aplique aparecerá un menú desplegable que contiene los siguientes elementos:
Propiedades— aparece el diálogo de Propiedades
Ayuda — enseńa este documento.
Acerca — muestra información básica acerca del Aplique del Monitor de Modem, incluyendo la versión del aplique y el nombre del autor.
Configuración
Puede configurar el Aplique del Monitor de Modem pulsando con el botón derecho del ratón sobre el aplique y seleccionando Propiedades…. Esto abrirá el diálogo de Configuración del Monitor de Modem (que se muestra en Figura 52, que le permite cambiar los parámetros de la configuración.
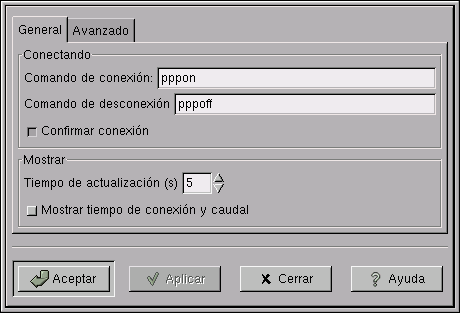
Las propiedades son:
Mostrar tiempo de conexión y caudal — el gráfico del Aplique del Monitor de Modem se modifica para incluir dos pequeńas cajas de texto que muestran el ratio de transferencia de datos en curso (el de arriba) y el tiempo transcurrido desde la conexión (el de abajo).
Comando de conexión: y Comando de desconexión: — Para usar el Aplique del Monitor de Modem para inicializar una conexión, ponga el nombre de la orden de inicio en la caja de texto Comando de conexión , y la orden para desconectarse en la caja debajo de ésta etiquetada como Comando de desconexión. Cuando pulse el único botón del aplique, se conectará o desconectará su modem.
Confirmar conexión — Muestra un diálogo pidiendo confirmación para la conexión.
Tiempo de actualización (s) — Indica el tiempo que tarda en actualizar el Aplique del Monitor de Modem con los datos actuales.
Mostrar tiempo de conexión y caudal — ańade dos cajas de texto en el aplique mostrando el tiempo que lleva conectado y el ratio de transferencia de datos. Esto es útil para monitorizar el funcionamiento de su modem.
Después de haber hecho todos los cambios que desee, pulse en el botón Aceptar para aplicar los cambios y cerrar el diálogo Propiedades. Para cancelar los cambios y restaurar los valores anteriores, pulse el botón Cancelar.

Ventana de propiedades avanzadas del Aplique del monitor de modem le permite controlar las características avanzadas del aplica.
Las propiedades son:
Archivo de bloqueo del modem: — especifica el archivo que el ordenador crea cuando el modem está en funcionamiento, permitiendo que otros programas sepan que está en marcha. El archivo /var/lock/LCK..modem es el valor por defecto, es el más común, si su ordenador usa un enlace simbólico desde /dev/modem al dispositivo ("device")de modem actual . Consulte con el administrador de su sistema para ver si usa un nombre de dispositivo diferente y por tanto que archivo de bloqueo utiliza. El Aplique de Monitor de Modemnecesita conocer esta información para encontrar y monitorizar su modem.
Verificar el dueńo del fichero de bloqueo — verifica que el archivo de bloqueo pertenezca al demonio PPP que esté actualmente funcionando y no es un archivo creado con anterioridad. Esta opción está habilitada por defecto y no debería cambiarse.
Dispositivo — El dispositivo, normalmente ppp0 en un equipo Linux, es el nombre del interfaz de red que el modem usa. Si el dispositivo ppp0 no es el que usa su equipo, consulte la documentación de su sistema para saber el nombre del dispositivo.
Otros nombres de interfaz de red comúnmente usados son ippp0 para Linux RDSI; isp0 para NetBSD RDSI y ipdptp0 para Solaris PPP.
Usar RDSI — Si utiliza un modem RDSI, habilite la casilla Usar RDSI. El Aplique del Monitor de Modem entonces ignorará todos los parámetros de configuración anteriores relacionados con los modems estándar.
Después de que haya hecho todos los cambios que desee, pulse en el botón Aceptar para aplicar los cambios y cerrar el diálogo Propiedades. Para cancelar los cambios y restaurar los valores anteriores, apriete el botón Cancelar.
Después de que haya hecho todos los cambios que desee, pulse en el botón Aceptar para aplicar los cambios y cerrar el diálogo Propiedades. Para cancelar los cambios y restaurar los valores anteriores, apriete el botón Cancelar.
Problemas conocidos y limitaciones
La casilla de Verificar el dueńo del fichero de bloqueo en la ventana de propiedades avanzadas debería estar siempre activada. Esto se corregirá en próximas versiones del Aplique del Monitor de Modem.
WebControl Applet
WebControl Applet, shown in Figura 54, allows you to launch your Netscape browser with the URL you indicate in the URL text box. To add this applet to a Panel, right-click on the panel and choose Panel->Add to panel->Applet->Network->WebControl
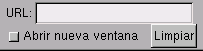
Usage
To use this applet, type the URL of the document you wish to view in the text box. For an Internet URL, you must type in http:// followed by the web address, for example, http://www.gnome.org. For a local file, simply type the file's name.
If you would like to launch a new browser window instead of using the currently active one, check the Launch new window check box.
Right-clicking on the applet brings up a menu containing the following items:
Properties— opens the Properties dialog
Help — displays this document.
About — shows basic information about WebControl Applet, including the applet's version and author's name.
Customization
You can customize WebControl Applet by right-clicking on it and choosing Properties…. This will open the Properties dialog (shown in Figura 55), which allows you to change various settings.

The properties are:
Display URL label — display the text Url: to the left of the text entry window in the applet.
Display "launch new window" option — display check box on the applet window allowing you to decide whether your document will be displayed in a new browser window or the currently open.
After you have made all the changes you want, click on OK to apply the changes and close the Properties dialog. To cancel the changes and return to previous values, click the Cancel button.
Known bugs and limitations
WebControl Applet only starts Netscape. If you don't have Netscape, it won't work. If you have a different browser set as your URL handler, Web Control Applet will still start Netscape.
WebControl Applet does not resize to match the size of the panel if the panel is smaller than WebControl Applet's normal height and width. This effects both small horizontal panels and all vertical panels.
Authors
WebControl Applet was written by Garrett Smith <gsmith@serv.net>. Please send all comments, suggestions, and bug reports to the GNOME bug tracking database. (Instructions for submitting bug reports can be found on-line. If you are using GNOME 1.1 or later, you can also use Bug Report Tool (bug-buddy), available in the Utilities submenu of Main Menu, for submitting bug reports.
This manual was written by John Fleck (<jfleck@inkstain.net>). Please send all comments and suggestions regarding this manual to the GNOME Documentation Project by sending an email to <docs@gnome.org>. You can also submit comments online by using the GNOME Documentation Status Table.