
This is the method I used in 2008 to scan color prints for Web use. Maybe it will work for you also. I am not an image format geek, but probably neither are you. This method is meant to help you get the best image possible from your photos for online use. Because I probably use a different image editor than you use, some commands may be located in different menus or be called something slightly different for you. But these tips are for techniques and concepts, for process, not for particular software. I hope you find them useful. -- Art Crimes Webmaster .
Summary of scanning method
- Scan photographs at twice their size (dimension) (200% magnification).
- Scan black and white drawings in grayscale mode.
- File format for final images: Save As JPG files, medium (quality/size).
- Finished size: 1024 x 786 pixels (or smaller) at 100 dpi (unless it is a panoramic view or several photos long.).
- Use lower-case letters and only numbers and letters in filenames, with NO SPACES. Use unique names that help you remember the content and origins of the image.
- Do not save scans as BMP files or GIFs. Instead, save raw scans as either PNG, TIFF, or Photoshop files for editing.
Start big
I use GraphicConverter (a Macintosh program) to scan and edit. Photoshop Elements and PhotoReady are other relatively cheap programs that edit images. Whatever you're using, scan at 200% size (magnification) (that is twice the dimension of the original photo) in order to get the details. Look for a % (percent) or something that looks like a ratio (2:1, for example) in the controls. You can't make scanned images bigger later without losing a lot of quality, but making them smaller works very well. You can later crop out extra sky, ground, and so on and your subject matter will be larger than the print when you are finished.
Scan at around 100 dpi for web use. Crop, Save As (you may need to choose "Save a Copy As") PNG format if you want to edit or print the image later. If you ever want to print an image, retain the PNG file for that. If you don't need to do any more editing, and you aren't going to print the image ever, then just Save As JPG.
Tips: If you plan to print your images in a magazine or book, scanning at 300 or 600 dpi is highly recommended. You can scan once, save a high resolution (600dpi) PNG or TIFF file, then change the resolution to 100 dpi and save another copy as a JPG for the Web. Later, when you want the print resolution image, you'll have it.
If you want to scan images for printing and Web but you don't have the time or the scanner, you could have a photo development place professionally scan your negatives or slides right onto discs.
Never save scans for the Web as GIFs or BMPs, because those formats can throw away about 16 million colors, most of which you probably want to keep, and once they are gone, they're gone. PNG, TIF and Photoshop formats keep more information in the image while you are editing it. After editing, Saving a Copy As JPG format gives you Web compatibility and reasonable compression with good file size.
Black and white images, sketches, illustrations
When scanning sketches or any other black and white images, scan them in grayscale (sometimes called "black and white photo" or "256 grays"), DO NOT choose plain "black and white" (sometimes called "bitmap" or "line art" or "drawing"). You'll get much cleaner lines and details with grayscale. When in doubt, scan in color ("color photo") and change it to grayscale later with the Image: Mode: Grayscale menu. When sketches are page-size, scan them at 100% dimension and 144 or 150 dpi.
Fix the contrast
Next you'll need to fix the "levels." Look in the menus until you find it. Play around with it. The important controls look like a black mountain with arrows underneath. You basically make sure the two end arrows (triangles) are under the edges of the black mountain on both ends. The goal is to end up with both a white white and a black black in your image. This contrast adjusting step is crucial to getting the best image possible. Don't overdo it though. Watch for disappearing yellows and browns. Pay attention to the details in the brightest and darkest areas to see how well your adjustment is working.
Tip: Dark pictures can sometimes be helped by moving the middle triangle.
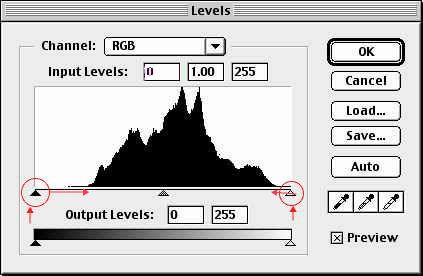
Levels: Simply move the two end triangles under the edge of the black mountain on both sides to fix the contrast. Then click OK.
Fix the Blur
Next sometimes I use "unsharp mask" (on the Filter: Sharpen menu in Photoshop). Usually once is plenty. The plain "sharpen" command tends to hurt more than it helps, so beware. Watch the straight lines when you do it to make sure they don't get too jagged. The "sharpen edges" filter sometimes has good effect also, but I prefer unsharp mask because it seems more subtle. In GraphicConverter, Filter:Sharpen Luminance is nice.
Crop
Crop the image so the picture has just what you want in it. You might not need all that sky and concrete.
Resize
Open the Image: Image Size menu. Notice the image sizes shown. I usually pay most attention to the longest side of the image.
If needed, make the image smaller so it fits on the screen.
Tips: Make sure you're viewing the image at 100% size (actual size) before you decide if it's too big or not.
Some people like to use images for their computer desktops, so getting the dimensions just right for the target monitor size can be important if you want to make that easy for them to do. Popular monitor sizes are 1024 x 768 or 1280 x 960. You can add more background area to an image by changing the "canvas size" in Photoshop or making a new, bigger image and copy/pasting the image into the new window. (Dont add backgrounds or borders for images to display on web pages though; use backgrounds just for desktop wallpaper or print images.)
If you think the picture can't be properly displayed at 1024 pixels wide (for a really long connecting series of photos, for instance) then it's okay to make the image wider, of course.
Save (a copy) as JPG and name it with an informative name like newyork2008cope2_01.jpg . Use _ instead of spaces.
Tip: Photoshop in recent versions wants you to choose "Save a Copy" instead of "Save As" when you wish to change the image format. Save the image as a JPG file and call it something descriptive with ".jpg" after the filename.
When you save a JPG, you'll see a compression/quality dialog box of some kind. It asks you to choose between image quality on one end and file size (compression) on the other.
For Web images, file size=time, so having a small (fast) file is MUCH more important than losing a little image quality, so choose "medium" quality. In Photoshop, I use setting 5 or 6 out of 10. Your program may have a slightly different scale, in which case choose "medium" or something between 50% and 75%. It is tempting to save as "100% quality," instead, but that's an expensive mistake in terms of download time. 66% quality is usually good enough and it makes for a much smaller file.
Tips: File size is crucial, because many people are still using modems from half the world away, and their time and bandwidth are limited and likely expensive. It might cost you too, because bandwidth = people + filesize and most hosts charge for bandwidth as your site gets busier. Smaller files are just better. Try for sizes less than 200k when the file is closed. Look at the file in a file list view in order to see its approximate size.
Compressed files, like JPGs, have two sizes, one for when they are open and one for when they are closed. It's the closed size that is transferred across the Internet when someone looks at your website, so that's the size to pay attention to.
Some image editors display the closed size next to the open size in the bottom of the image's window or in the Save As dialog box where the compression/quality choice is shown.
Be sure your filename has no spaces, accented letters, or funny punctuation in it. Use only numbers, letters and . - _ (period, hyphen, underscore), and be sure to end the filename with ".jpg" .
Names are important. They will help your images communicate with people and help keep the images from becoming anonymized. Don't name files "graf1" or "file01" or anything like that. Name them with unique and meaningful names like "greendragon01_katch2001fr8.jpg" and "ectoplasm1_20020701_nyc.jpg".
Use dates to make your filenames unique. If known, use the artist or photographer's name or the image topic too, so you can find it again without opening it to look at it, and so it doesn't become completely anonymous when someone saves it. Example: smith_cat_sketch20020724.jpg
Big images and their thumbnail images (previews that are smaller) should be named almost the same, so they will be together in the file listing, for example, ectoplasm01.jpg (big) and ectoplasm01x.jpg (small). I changed only the last character before the "." (dot).
Remember that with image editing, less is better.
last edited: August 21, 2008
DESIGN NECK/CNS